Building your own pizza oven starts with careful planning of the layout, choosing high-quality, heat-resistant materials, and creating a solid foundation. Shape the dome precisely, reinforce it with good insulation, and seal all joints properly. During testing, you’ll find hotspots or moisture issues to fix. If you keep these tips in mind, you’ll improve each step. Stay tuned to discover more tricks that can help you build a better DIY pizza oven.
Key Takeaways
- Prioritize thorough planning and material selection to ensure thermal mass, insulation, and proper ventilation for optimal pizza baking.
- Focus on building a stable foundation and precise dome shaping to enhance heat retention and structural integrity.
- Use high-quality, heat-resistant materials like firebricks and refractory mortar, and ensure proper sealing for efficiency.
- Conduct comprehensive testing of temperature consistency, heat distribution, and ease of cleaning to identify improvements.
- Reflect on construction and operational challenges to refine insulation, airflow, and sealing techniques for better future results.
![Pizza Peel Aluminum Pizza Spatula, Mooues 12 inch Metal Pizza Paddle(12"x 14")with Rocker Cutter Foldable Wood Handle, [Storage bag included], for Family Pizza Oven Baking Pizza, Dough, Bread & Pastry](https://m.media-amazon.com/images/I/41ED4zwN87L._SL500_.jpg)
Pizza Peel Aluminum Pizza Spatula, Mooues 12 inch Metal Pizza Paddle(12"x 14")with Rocker Cutter Foldable Wood Handle, [Storage bag included], for Family Pizza Oven Baking Pizza, Dough, Bread & Pastry
【Storage Bag Included】: We have specially equipped a storage bag In order to provide a variety of storage...
As an affiliate, we earn on qualifying purchases.
Planning and Designing the Oven Layout
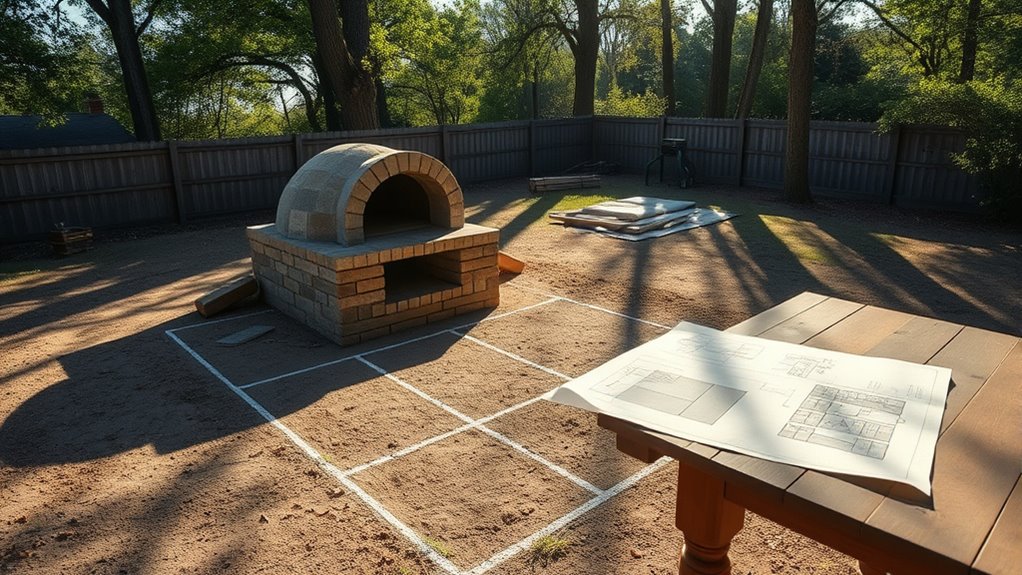
Before you begin building your DIY pizza oven, it’s essential to carefully plan and design the layout. Focus on maximizing thermal mass, which retains heat and ensures consistent cooking temperatures. A well-thought-out thermal mass helps your oven stay hot longer, reducing the need for frequent fire-starting. Equally important is ventilation design; proper airflow regulates temperature and removes smoke efficiently. Think about where you’ll place vents and how they’ll promote good circulation without cooling the oven prematurely. Consider the oven’s size and shape to optimize heat retention and airflow. Clear planning at this stage prevents major adjustments later, saving time and effort. A balanced approach to thermal mass and ventilation design creates a durable, efficient, and enjoyable pizza-making experience.

Checkered Chef Pizza Peel - Extra Large, Stainless Steel Metal Pizza Paddle with Folding Handle, Outdoor Pizza Oven Accessories - 13 Inch x 15 Inch
Easy Peeling and Cleaning: This thin metal pizza peel makes it easier than ever to get your pie...
As an affiliate, we earn on qualifying purchases.
Gathering Materials and Tools

To build your DIY pizza oven efficiently, you need to gather all the necessary materials and tools beforehand. Proper material selection assures durability and heat resistance, so choose high-quality bricks, fireclay, and insulation materials. Safety precautions are essential, so have your gloves, goggles, and a dust mask ready. Here are four key items to gather:
Gather high-quality bricks, insulation, and safety gear for a successful DIY pizza oven project.
- Firebricks or refractory bricks for the oven interior
- High-temperature mortar for bonding bricks
- Insulation materials like ceramic fiber or vermiculite
- Basic tools such as a trowel, level, and safety gear
Making sure you have everything prepared saves time and keeps your project safe and efficient. Focus on selecting the right materials and prioritizing safety to set a solid foundation for your pizza oven.

Pizza Peel and Pan Set, 6 Piece Pizza Oven Accessories, 12 Inch Metal Pizza Paddle with Foldable Wooden Handle, 8 Inch Metal Peel, Rocker Cutter, Server, Stainless Steel Plates and Tongs
【All-in-One 6-Piece Pizza Oven Accessories Kit】This set includes a 12-inch foldable pizza peel, 8-inch mini pizza peel, professional...
As an affiliate, we earn on qualifying purchases.
Building the Foundation and Base

Building a solid foundation is crucial to guarantee your pizza oven remains stable and durable over time. Start by crafting detailed oven plans that specify dimensions and structure. This helps you visualize the base and ensure stability. When sourcing materials, choose sturdy options like concrete blocks, bricks, or poured concrete for the foundation. Make sure the ground is level and compacted before laying the base. Use a level to keep everything even, preventing future issues with uneven cooking or instability. Reinforce the foundation with rebar if needed, especially for larger ovens. Properly constructing the foundation sets the stage for a successful build, ensuring your oven stays safe and functional through years of use. Precision at this stage saves you time and effort later.

Pizza Peel Pizza Pan Set, 7Pcs Pizza Oven Accessories, 12 Inch Metal Paddle (12"x 14") with Foldable Wooden Handle, 2 Pizza Pans, Rocker Cutter, Pizza Server, Oven Mitts, Oil Brush
【Premium Carbon Steel & Food Grade Materials】Professional-grade pizza set made with safe, durable materials: The pizza peel is...
As an affiliate, we earn on qualifying purchases.
Constructing the Oven Dome

When constructing the oven dome, you need to select the right material that can endure high temperatures and is easy to shape. Properly shaping the dome ensures even heat distribution and structural stability. Don’t forget to insulate well to keep the heat inside and improve cooking efficiency.
Choosing the Right Material
Choosing the right material for your pizza oven dome is essential because it determines heat retention, durability, and overall cooking performance. Using fireproof bricks ensures your dome withstands high temperatures without cracking. Refractory mortar bonds the bricks securely and resists heat stress. Consider these options:
- Fireproof bricks for insulation and heat resistance
- Refractory mortar to seal and strengthen the structure
- Clay bricks for affordability and ease of handling
- Insulating materials like ceramic fiber for improved heat retention
Select materials based on your climate, budget, and desired oven efficiency. Properly chosen fireproof bricks combined with refractory mortar create a robust, heat-efficient dome that lasts for years. Avoid using regular bricks or mortar not rated for high temperatures to prevent cracks and structural failures.
Shaping the Dome Properly
To guarantee your pizza oven heats evenly and is structurally sound, shaping the dome correctly is crucial. Focus on dome shaping with careful arch precision to ensure stability and ideal heat distribution. Use a template to guide your curve, maintaining consistent curvature throughout. Proper arch precision minimizes gaps and weak points, preventing heat loss and structural failure. To achieve this, follow these key steps:
| Step | Tip | Purpose |
|---|---|---|
| 1 | Use a sturdy template | Ensures consistent arch shape |
| 2 | Maintain even mortar joints | Promotes stability |
| 3 | Check curvature frequently | Avoids uneven shaping |
Insulating for Heat Retention
Insulating the oven dome is essential to retain heat and improve cooking efficiency. Proper insulation ensures your pizza oven stays hot longer, reducing fuel use and cooking time. Here are four key insulation types to consider:
- Mineral wool – excellent heat retention and fire resistance.
- Perlite or vermiculite – lightweight, affordable options with good insulation properties.
- Ceramic blanket – high-temperature resistance, ideal for oven domes.
- Foam board – easy to install, but less heat-resistant; best combined with other insulations.
Choosing the right insulation type influences heat retention and overall oven performance. Proper insulation minimizes heat loss, making your pizza oven more efficient and ensuring perfectly cooked pies every time.
Installing the Finishings and Firebox

Now it’s time to choose finishes that can withstand high heat and weather conditions. You’ll also need to install the firebox correctly to ensure safety and efficiency. Don’t forget to seal everything well to retain heat and improve cooking performance.
Selecting Durable Finishes
Have you considered which finishes will withstand the intense heat and weather conditions your DIY pizza oven will face? Choosing durable finishing options is vital for longevity and safety. To guarantee your oven remains protected, consider these key points:
- Use heat-resistant, fireproof materials like firebrick or refractory cement for the firebox.
- Apply weatherproofing techniques such as high-temperature sealants and waterproof coatings on exterior surfaces.
- Select finishes that resist cracking and peeling under thermal stress, like ceramic tiles or stucco with proper curing.
- Regular maintenance and reapplication of weatherproofing treatments will prolong your oven’s lifespan.
Installing the Firebox Properly
To guarantee your firebox functions safely and efficiently, you need to install it correctly within your pizza oven structure. Start by securing the firebox firmly to prevent shifting during use. Proper firebox insulation is essential; it helps retain heat and protects surrounding materials from intense temperatures. Ensure the insulation is installed evenly around the firebox’s walls, avoiding gaps that could cause heat loss. Additionally, chimney positioning is critical—place the chimney at the top of the firebox, aligned to promote proper smoke venting and airflow. Correct chimney placement prevents smoke buildup and ensures efficient drafting. Take your time to double-check these elements, as a well-installed firebox with appropriate insulation and correct chimney positioning lays the foundation for a safe, durable, and high-performing pizza oven.
Sealing for Heat Retention
Sealing the firebox and installing the finishings are crucial steps to maximize heat retention in your pizza oven. Proper sealing prevents heat loss and maintains consistent cooking temperatures. To do this effectively, consider these key actions:
- Apply high-temperature thermal insulation around the firebox to minimize heat escape.
- Use a moisture barrier to protect insulation from moisture damage and prolong its effectiveness.
- Seal all joints and seams with heat-resistant mortar or fireproof caulk to prevent drafts.
- Finish with a durable, heat-resistant outer layer to reflect heat inward and improve overall efficiency.
These steps help retain heat, improve energy efficiency, and ensure your oven stays hot enough for perfect pizzas every time. Proper sealing is essential for a successful DIY pizza oven.
Testing, Cooking, and Reflecting on Improvements
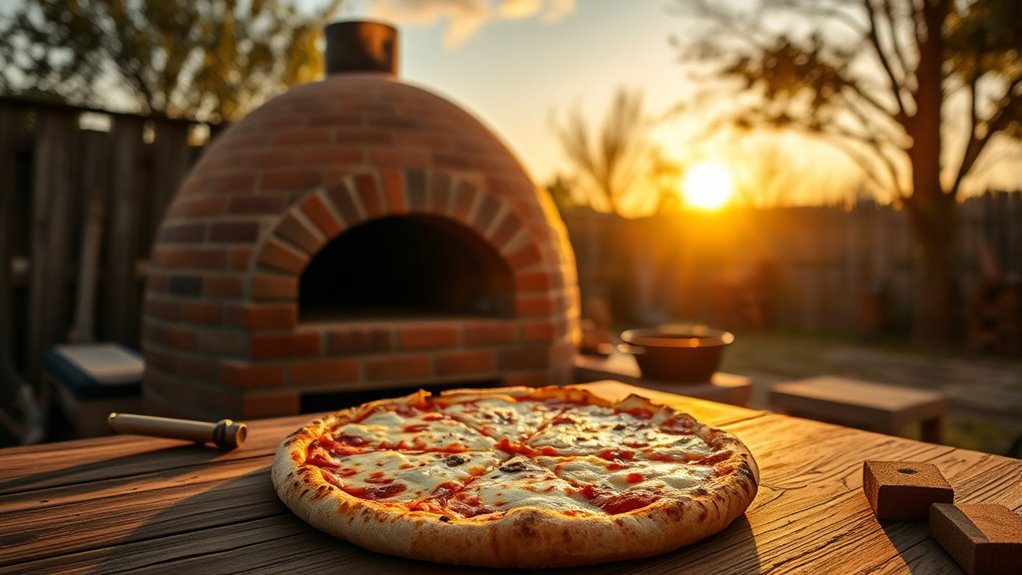
Once you’ve built your DIY pizza oven, conducting a thorough test by cooking a few pizzas to see how it performs is vital. Pay attention to how evenly the heat cooks your pizza toppings and note any hotspot issues. Use this opportunity to assess oven cleaning ease after each use, ensuring it remains functional and safe. Reflect on how the temperature consistency affects your pizza quality and whether adjustments are needed. Consider tweaking the insulation or airflow for better results. Recording your observations helps identify what works and what doesn’t, guiding future improvements. Remember, testing isn’t just about cooking; it’s about refining your process to achieve that perfect, crispy crust every time.
| Test Aspect | Observation/Notes |
|---|---|
| Heat Distribution | Even or hotspots? |
| Temperature Control | Easy or tricky to maintain? |
| Oven Cleaning | How simple or complex? |
| Pizza Toppings | Cooked evenly and flavorful? |
Frequently Asked Questions
What Safety Precautions Should I Consider During Construction?
You should wear safety gear like goggles, gloves, and a dust mask to protect yourself during construction. Make certain the structure’s integrity by carefully following building plans, using quality materials, and avoiding shortcuts. Keep your workspace clear of debris and sharp objects to prevent accidents. Double-check measurements before cutting or pouring concrete. By prioritizing safety gear and maintaining structural integrity, you reduce risks and build a durable, safe pizza oven for years to come.
How Much Did the Entire Project Cost?
The entire project cost around $500. Your cost breakdown includes materials like firebricks, mortar, and a metal door, which make up the bulk of expenses. Choosing quality materials guarantees durability and heat retention, but it can increase costs. You might save money by sourcing second-hand bricks or using alternative insulation. Overall, planning your material choices carefully helps you stay within budget while building a sturdy, functional pizza oven.
How Long Did It Take to Complete the Oven?
The construction timeline for your DIY pizza oven took about three weekends, totaling roughly 12 to 15 hours of work. You’ll find the project duration varies depending on your skill level and the complexity of your design, but planning ahead helps. By breaking it into manageable steps, you ensure steady progress without feeling overwhelmed, making the project more enjoyable and efficient.
Can I Build a Pizza Oven in a Small Backyard?
Yes, you can build a pizza oven in a small yard, even with space constraints. Focus on compact designs like a portable or countertop oven, or build a smaller, standalone model that fits your available space. Use lightweight materials and plan carefully to maximize your yard’s layout. With some creativity, you’ll enjoy delicious homemade pizzas without sacrificing precious outdoor space.
What Are Common Mistakes to Avoid During Construction?
You should avoid poor insulation choices that can lead to heat loss and uneven cooking. Be careful when sourcing materials—skimping on quality or using incompatible items can cause structural issues. Make sure you properly layer insulation and verify all materials are suitable for high temperatures. Don’t rush the curing process or overlook local building codes. Taking time for proper planning and sourcing helps prevent costly mistakes and guarantees a durable, efficient pizza oven.
Conclusion
Building your own pizza oven is a rewarding journey, and every step teaches you something new. While you might do things differently next time, remember that practice makes perfect. As the saying goes, “Haste makes waste,” so take your time and learn from each project. With patience and persistence, you’ll craft a oven that not only cooks great pizza but also becomes a cherished part of your home.