
This guide helps beginner home cooks choose a backyard pizza oven, prepare a safe cooking area, and bake a pizza with a well-cooked base and toppings. Allow 2-4 hours for setup and your first session, including preheating; later cooks usually take less time once you know your oven.

Get kitchen gear delivered free — and shop member deals
- Fast, free delivery on millions of items
- Access to Prime Big Deal Days deals on October 6–7
- Prime Video, Amazon Music and more included

BIG HORN Portable Propane Gas Pizza Oven with 15 Inch Pizza Stone, Stainless Steel Outdoor Pizza Maker
- ✔ Fuel: Propane
- ✔ Burners: Dual-side, 23,000 BTU total
- ✔ Maximum temperature: 1070°F

BIG HORN 12" Outdoor Pizza Oven, 3-in-1 Multi-Fuel (Wood Pellet, Gas, Electric), Max 1110°F
- ✔ Fuel: Wood pellets included; compatible gas and electric burners sold separately
- ✔ Pizza size: 12 inches
- ✔ Maximum temperature: 1110°F

BIG HORN 12-Inch Multi-Fuel Outdoor Pizza Oven, Wood/Gas/Electric Compatible, Portable, Black
- ✔ Fuel: Wood pellets; optional gas and electric burners sold separately
- ✔ Pizza stone: 12 × 12 inches
- ✔ Maximum temperature: 1110°F
Difficulty: Beginner | Time: 2-4 hours for setup and a first cooking session
What You’ll Need
Tools & Materials:
- Outdoor pizza oven rated for the fuel you plan to use
- Stable, heat-resistant outdoor stand or surface
- Fuel specified by the oven maker, such as seasoned hardwood or propane
- Infrared thermometer, if recommended for your oven
- Pizza peel and heat-resistant gloves
- Dough, sauce, cheese, and toppings
- Metal ash container with a lid for wood-fired ovens
Knowledge:
- Basic outdoor fire and food-handling safety
- How to follow the oven maker’s assembly, clearance, and fuel instructions
Check local rules, rental or homeowners’ restrictions, and the oven’s manual before buying or lighting it. Keep the oven outdoors in an open, ventilated area, away from buildings, branches, fences, and anything combustible. Do not use a portable outdoor oven indoors, in a garage, or under a low roof. Use the manual’s clearance distances and fuel requirements.
BIG HORN Portable Propane Gas Pizza Oven with 15 Inch Pizza Stone, Stainless Steel Outdoor Pizza Maker
For most backyard cooks, the 15-inch propane oven is the easiest of these three to recommend. Its stated 14.7-inch pizza capacity gives us more room than the 12-inch models, which matters when shaping dough or feeding several people. It reaches 750°F in 10 minutes and can climb to 1070°F, while its dual-side burners produce 23,000 BTU. The supplied peel and regulator hose also make it a more complete starting setup than either pellet oven, though the propane tank itself is separate.Compared with the 12-inch options, this oven trades the ability to switch among fuel types for a larger cooking area and propane controls. The built-in thermometer and dual knobs offer useful signals and adjustments, but high heat still rewards attention: the description warns that food can burn without practice. Its roughly 60-second pizza cook time is quick, so we should expect to monitor and turn food as needed rather than treat it like a slow, unattended grill. The stainless steel body can disassemble for cleaning and transport, yet its larger stone makes it less of a compact carry choice than the 25-pound pellet ovens.Choose it for roomy, convenient backyard cooking when propane is already part of your outdoor setup. Skip it if changing between pellet, gas and electric fuels matters more than stone size.
Pros:
- Largest stated pizza capacity in this comparison, at up to 14.7 inches
- Reaches 750°F in 10 minutes and up to 1070°F
- Includes a foldable peel, pizza stone and propane regulator hose
- Can also cook meats and vegetables
Cons:
- Propane tank must be supplied separately
- Very high heat can burn food without close attention and practice
- Less compact in cooking capacity than the 12-inch folding-leg models
Best for: Backyard hosts who want a larger pizza surface, quick propane setup and included basic accessories.
Not ideal for: Cooks who want multi-fuel compatibility, a 12-inch portable format or an oven that needs little attention at very high heat.
Bottom line: We rank this first for its larger cooking surface and more complete propane setup, provided a separate tank and attentive cooking suit your routine.
“We rank this first for its larger cooking surface and more complete propane setup, provided a separate tank and attentive cooking suit your routine.”
BIG HORN 12" Outdoor Pizza Oven, 3-in-1 Multi-Fuel (Wood Pellet, Gas, Electric), Max 1110°F
This 12-inch oven is the choice for backyard cooks who want to begin with pellets and keep other fuel options open. Wood pellets are included; gas and electric burners are compatible but sold separately. That distinction matters: the three-fuel claim describes a platform for adapting the oven, not three complete burner setups in the box. At 25 pounds with folding legs and tool-free assembly, it is easier to move or store than a larger cooking station.The oven is listed to reach 1110°F after an 18–20-minute heat-up and cook pizza in 60–90 seconds. Against the 15-inch propane model, it gives up cooking area and a faster stated warm-up to 750°F, but offers more fuel flexibility and a compact footprint. Against the black 12-inch version, the listed cooking format and key performance figures are essentially the same, so this pick earns its role through the explicit 3-in-1 positioning and included pellets rather than a demonstrated performance edge.We should also account for the work involved. The small cooking surface means smaller pizzas, and the product information calls for frequent turning to cook evenly. Pellet storage needs care too: hardwood pellets should be kept airtight. Choose this model if fuel adaptability is worth those extra steps; if the goal is simply a larger backyard pizza with fewer fuel decisions, the propane oven is a better fit.
Pros:
- Wood pellets are included, with gas and electric burners supported as optional attachments
- Listed maximum temperature of 1110°F
- 25-pound body with folding legs and tool-free assembly
- Stainless steel construction
Cons:
- Gas and electric burners are sold separately
- Requires frequent turning for even cooking
- Hardwood pellets need airtight storage
Best for: Outdoor cooks who want to use pellets now and may add compatible gas or electric burners later.
Not ideal for: Anyone seeking a larger pizza surface, a ready-to-use gas setup or a low-attention cooking process.
Bottom line: We recommend it when optional fuel changes and portability matter more than a larger stone or a fully equipped propane setup.
“We recommend it when optional fuel changes and portability matter more than a larger stone or a fully equipped propane setup.”
BIG HORN 12-Inch Multi-Fuel Outdoor Pizza Oven, Wood/Gas/Electric Compatible, Portable, Black
The black 12-inch model is a compact backyard and travel option with the same central appeal as the other pellet oven: high heat in a 25-pound folding-leg format. It uses wood pellets and is compatible with optional gas and electric burners. The stated 1110°F maximum and 18–20-minute warm-up put it in the same general cooking bracket as the B08T9HMMWC, while the 12-inch stone keeps batches smaller than with the 15-inch propane oven.That close overlap is important for choosing between the two. The supplied information does not identify a meaningful difference in heat, capacity or portability, so we would not pay or choose based on an assumed performance improvement. The clear distinction is the black finish and the explicit compatibility with BIG HORN burner attachments. Like its sibling, these attachments are sold separately, and frequent pizza turning remains part of the cooking routine. Minimal assembly does not mean no cleanup or setup.Compared with the propane model, this oven favors transport and fuel choice over a wider cooking surface and included propane accessories. It also lists meats and vegetables among its uses, although the details provided focus most heavily on pizza. We see it as a sensible match for cooks who specifically prefer the black compact format and understand the accessory costs and hands-on cooking involved; otherwise, the near-identical 12-inch alternative or the roomier propane oven may be easier to justify.
Pros:
- Portable 25-pound design with folding legs
- Wood pellets work as the listed fuel, with optional gas and electric compatibility
- Reaches a stated maximum of 1110°F
- Compact dimensions suit storage and outdoor trips
Cons:
- Gas and electric burner attachments are sold separately
- 12-inch stone limits pizza size compared with the propane oven
- Frequent turning and some cleaning are still required
Best for: Cooks who want a portable black-finish oven for backyard use, camping or tailgating and value optional fuel compatibility.
Not ideal for: Buyers who need a larger pizza stone, included gas or electric burners, or a clearly distinct upgrade over the other 12-inch model.
Bottom line: We choose this as the compact black-finish alternative, while its stated performance closely matches the other 12-inch BIG HORN oven.
“We choose this as the compact black-finish alternative, while its stated performance closely matches the other 12-inch BIG HORN oven.”
As an Amazon Associate we earn from qualifying purchases.
Before You Start
Pick a dry, level spot with room to work and a safe route away from children and pets. Check the weather and wind: strong gusts can affect flames and carry sparks. Read the full manual before assembly, especially instructions for gas connections, first firing, and cooling. Prepare toppings in small amounts and keep them refrigerated until needed. Let dough warm as its recipe directs so it stretches without tearing.
Step-by-Step Instructions
Step 1: Choose an oven for your cooking space
Choose a wood-, gas-, or multi-fuel oven to match your cooking preferences. For a wood model, plan for fuel storage, ash handling, and tending the fire during cooking. For a gas model, confirm that you have a compatible supply and connection. Measure the cooking surface against the pizza size you plan to make, then check the oven’s weight, assembly needs, fuel limits, and required clearances.
Tip:Check whether the oven is designed for the temperatures and pizza styles you want to cook. A compact oven may suit personal pizzas but leave little room to turn them.
Check: You can name your intended fuel, confirm the oven fits your space and budget, and identify the surface and clearances it requires.
Step 2: Assemble the oven and prepare the cooking area
Assemble the oven exactly as its manual directs, using its approved stand or a stable, heat-resistant surface. Position it outdoors and measure the distance from walls, overhangs, furniture, and other combustible materials to confirm the manual’s clearances. Arrange the oven so the controls and cooking opening are accessible. Place fuel, tools, and ingredients within reach without requiring you to cross in front of the hot opening.
Tip:Do not place an oven on a plastic table, unstable cart, or surface that can scorch. Never move a lit or hot oven.
Check: The oven is level and steady, its clearances meet the manual, and your work area leaves a clear path around the hot oven.
Step 3: Prepare the fuel and safety equipment
Gather only the fuel specified for your oven. For a wood oven, use clean, dry, untreated hardwood cut to the maker’s recommended size; avoid painted, treated, or resinous wood. For a gas oven, connect only the approved regulator, hose, and cylinder or supply, following the manual. Check connections using the method the maker specifies before lighting. Put on heat-resistant gloves and place a suitable fire extinguisher within reach.
Tip:Never add lighter fluid or other accelerants unless the oven maker explicitly permits them. Keep spare fuel and gas cylinders away from the hot oven as directed by the manual.
Check: You have the correct fuel, the oven has passed its specified connection checks, and protective equipment is within reach.
Step 4: Preheat the oven fully
Light the oven using its stated procedure. For a wood oven, build a small fire, then add fuel gradually; move the flame or burning wood as the manual directs. For gas, ignite and adjust the burner as instructed. Preheat for the maker’s recommended time. If the manual recommends an infrared thermometer, measure the cooking surface at several points because the center and edges may differ.
Tip:A glowing ceiling does not prove the stone is ready. If the surface is too cool, the base can dry out before it browns; if it is too hot, the base may burn before the toppings cook.
Check: The oven and cooking surface have reached the stated operating range, and the flame is stable without unusual smoke or gas odor.
Step 5: Shape and top one pizza
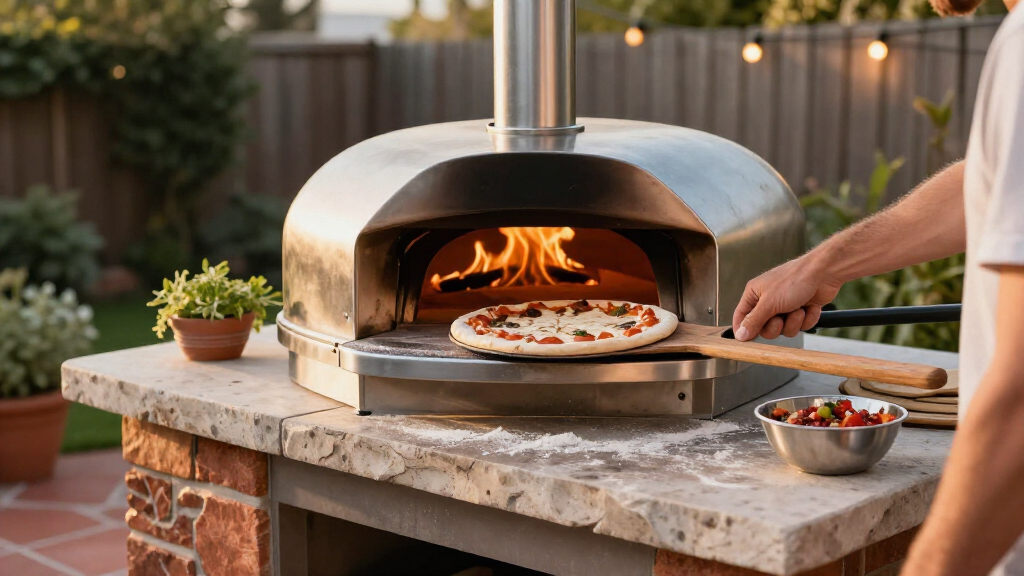
Dust the peel lightly with flour or the material recommended by the oven maker. Stretch one dough ball on a clean surface, leaving a slightly thicker rim. Spread on a thin layer of sauce, then add a modest amount of cheese and toppings cut small enough to cook quickly. Shake the peel gently to check that the pizza moves freely. If the dough sticks, lift an edge and add a little more dusting before approaching the oven.
Tip:Heavy toppings and excess sauce weigh down the center and can make the pizza stick. Prepare each pizza shortly before baking rather than leaving it on the peel.
Check: The topped pizza slides freely when you shake the peel, and the center is not overloaded.
Step 6: Launch, turn, and monitor the pizza
Stand to the side of the opening and slide the pizza onto the hot surface with a short, controlled peel motion. Watch it continuously; high-heat ovens can cook a pizza in a few minutes. When the rim facing the flame puffs and browns first, turn the pizza with a turning peel or other tool the maker recommends. Rotate it in small increments until the crust is browned around the edge and the cheese is bubbling.
Tip:Keep your face and hands back from the opening, and avoid reaching over the flame. If the base darkens too quickly, move the pizza to a cooler part of the oven or reduce the heat as directed.
Check: The crust has browned evenly after turning, the toppings are hot, and the center lifts without remaining doughy.
Step 7: Remove the pizza and cook the next one
Slide the peel fully under the pizza and lift it onto a heat-safe board or tray. Let it rest briefly before slicing. Check the cooking surface temperature before launching the next pizza; allow it to recover or reduce the flame if the oven’s heat has changed. Top fresh dough for each pizza, and clear loose flour and burned debris from the peel between launches.
Tip:Use separate utensils or clean hands and surfaces when handling raw meat toppings. Cook meat safely and avoid relying on the crust color alone to confirm it is done.
Check: Each pizza has a browned base, cooked toppings, and slices that hold their shape after a short rest.
Step 8: Shut down and clean the oven
Turn off a gas oven at the controls and close the cylinder valve as the manual directs. For a wood oven, stop adding fuel and allow the fire and ash to cool completely. Do not pour water into a hot oven or handle live embers. Once the oven and ash are cold, remove ash with the maker’s recommended tool and place it in a lidded metal container. Brush the cooking surface when cool and wipe other parts as specified by the maker.
Tip:Ash can remain hot long after flames disappear. Store the container away from combustible materials until the ash is cold.
Check: The fuel is shut off or the fire is fully out, the oven is cooling in place, and cold ash and food debris are removed safely.
Common Mistakes to Avoid
- Setting the oven on a weak or combustible surface. — Use the oven maker’s approved stand or a level, heat-resistant surface rated for the oven’s weight and heat.
- Launching before the cooking floor is hot enough. — Follow the stated preheat time and check the surface temperature where the manual recommends.
- Overloading the pizza with sauce or toppings. — Use a thin layer of sauce and moderate toppings so the center can cook and the dough can slide from the peel.
- Leaving the pizza unattended or forgetting to turn it. — Stay beside the oven while cooking and turn the pizza as soon as the side facing the flame browns.
Troubleshooting
Problem: The dough sticks to the peel.
Solution: Before topping, check that the peel has a light dusting. Work quickly, use less sauce, and shake the peel before launching. If it still sticks, lift the dough edge and dust underneath rather than forcing it into the oven.
Problem: The crust burns while the toppings remain undercooked.
Solution: Lower the heat or move the pizza to a cooler area if the oven allows it. Use less topping and confirm the cooking floor is within the manual’s recommended range before the next launch.
Problem: The pizza is pale or the base stays soft.
Solution: Allow the cooking floor to preheat longer, and check its temperature rather than judging by the flame alone. Use less sauce and avoid wet toppings.
Problem: The gas burner will not light or the flame goes out.
Solution: Turn off the controls and follow the manual’s relighting and connection checks. If you smell gas, shut off the supply if safe, move away, and follow the supplier’s emergency guidance; do not keep trying to ignite the oven.
What Success Looks Like
Your oven stands securely outdoors with the required clearance, uses the approved fuel, and reaches its specified cooking range. The pizza releases from the peel, cooks without burning, and has a browned base, a cooked center, and hot toppings. After cooking, the fuel is shut down safely and ash is handled only after cooling.
Next Steps
After the oven has cooled, cover or store it as the maker directs, and keep fuel dry and safely stored. Note the preheat time, surface temperature, and cooking time that worked for your oven. Repeat with small changes to dough thickness or topping amounts, changing one variable at a time. Arrange service or contact the maker if the oven, hose, regulator, or burner shows damage.
Frequently Asked Questions
Do I need a thermometer for a backyard pizza oven?
Check the manual. An infrared thermometer is useful for measuring the cooking surface because the flame and stone can heat unevenly. Use the oven maker’s recommended range and measurement points.
Can I use a pizza oven under a covered patio?
Only if the oven maker permits that location and the required overhead and side clearances can be met. The area must have adequate ventilation. Do not use an outdoor oven in an enclosed space, garage, or other area where exhaust can build up.
Which fuel should I choose?
Choose based on the oven’s approved fuel and the work you want to manage. Wood requires tending and ash cleanup; gas provides burner control but needs a compatible, correctly connected supply. Never use a fuel the oven is not designed for.
How long should I preheat the oven?
Use the time and temperature in the oven manual. The needed time varies by oven, fuel, and weather, so check the cooking surface where possible instead of relying on a fixed time alone.
When can I clean the ash?
Wait until the fire and ash are fully cold. Transfer ash with the recommended tool into a lidded metal container, then store it away from anything that can burn until there is no remaining heat.
Fall Picks
fall essentials
As an affiliate, we earn on qualifying purchases.