
To remove rust and repaint your grill, start by removing removable parts and cleaning the surface thoroughly with a wire brush to scrub away loose rust and old paint. Use vinegar or a rust remover on stubborn spots, then dry everything completely to prevent new rust. Apply a heat-resistant primer or rust inhibitor, followed by high-temperature grill paint. Reassemble the parts and perform a low-heat test—continue to discover detailed steps for a successful restoration.
Key Takeaways
- Remove loose rust and debris using wire brushes and sandpaper for a smooth surface.
- Apply a rust remover or vinegar to dissolve stubborn rust spots effectively.
- Thoroughly dry the grill to prevent new rust formation before applying primer.
- Use heat-resistant, high-temperature paint to restore and protect the grill surface.
- Regularly inspect, clean, and dry the grill to prevent future rust buildup and prolong lifespan.
Gather Your Supplies and Prepare the Area

Before you begin cleaning your grill rust, you need to gather all the supplies you’ll require and prepare the work area. First, collect cleaning supplies like steel wool, wire brushes, rust remover, and protective gloves. Keep a bucket of water, rags, and mild soap nearby for quick cleanup. Make sure your work space is well-ventilated to avoid inhaling fumes from cleaning agents. Safety precautions are essential—wear gloves, eye protection, and a mask if necessary. Clear the area of any flammable materials to prevent accidents. Proper preparation ensures you work efficiently and safely, reducing the risk of injury or damage. Following these cleaning tips and safety precautions helps you create a clean, safe environment for rust removal and future grilling adventures.
Remove the Grill Grates and Other Removable Parts

Start by removing all grill grates and other detachable parts, such as warming racks or drip trays. This step is essential for effective rust prevention and thorough grill maintenance. As you lift these parts out, imagine exposing the bare metal surfaces that need cleaning and rust removal. To make the process smoother, keep these items in a safe, clean area. Picture yourself:
Remove all detachable parts to access and clean the grill’s bare metal surfaces effectively.
- Inspecting each part for rust or buildup
- Brushing off loose debris and grease
- Soaking removable parts in warm, soapy water
- Drying everything thoroughly to prevent new rust formation
Removing these pieces gives you clear access to the grill’s interior, making it easier to clean and prepare for repainting. Properly handling these parts helps extend their lifespan and keeps your grill in top shape.
Clean the Grill Surface Thoroughly

To effectively remove rust and prepare your grill for continued use, you need to clean its surface thoroughly. Proper grill cleaning ensures all debris, grease, and loose rust are removed, creating a smooth, clean surface for repainting. Use a stiff wire brush or scouring pad to scrub the surface, paying close attention to corners and crevices. Follow up with warm, soapy water or a specialized degreaser to eliminate grease and residue. Rinse completely and dry with a clean cloth to prevent new rust formation. This step is vital for surface preparation, as it guarantees that paint or rust remover will adhere properly. A meticulously cleaned surface results in a more durable, even finish and extends your grill’s lifespan.
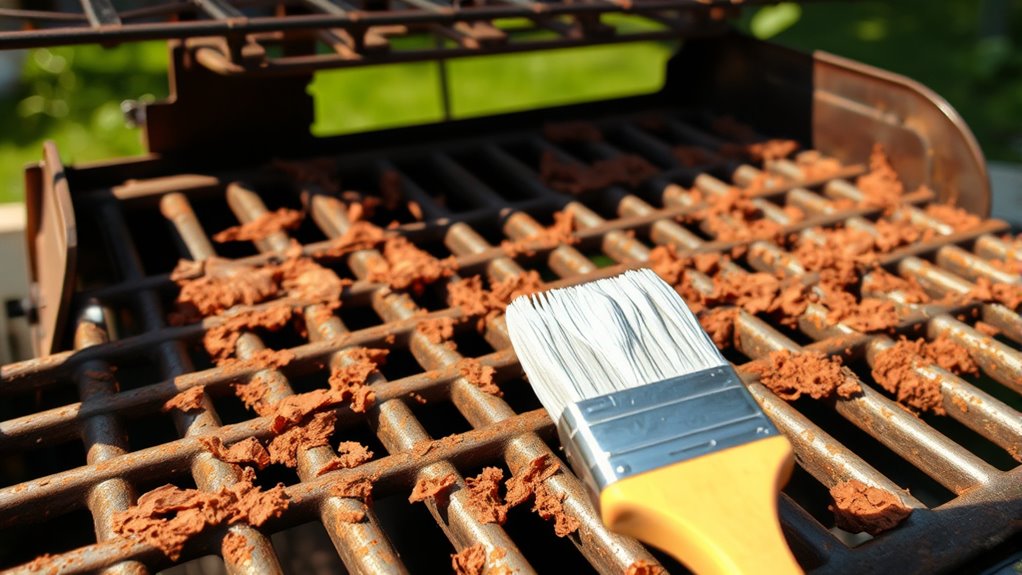
Scrape Off Loose Rust and Old Paint

Grab a wire brush and scrub away any loose rust and old paint from your grill. For smoother areas, sand gently with fine grit to create an even surface. Taking these steps guarantees your grill is properly prepared for the next phase of restoration.
Use a Wire Brush
Before applying any rust treatment or paint, you need to remove loose rust and old paint from the grill surface. Using a wire brush is essential for effective rust removal. Grab a sturdy wire brush and scrub the affected areas vigorously. This helps loosen and lift stubborn rust and peeling paint, revealing a cleaner surface. As you work, you’ll notice rust particles flying off, leaving a rougher surface ready for the next steps. To visualize, imagine:
- Bristly wire bristles scraping away flaky paint
- Rust chips falling onto the ground
- The surface turning brighter as rust is removed
- The sound of wire bristles scraping against metal
Using a wire brush ensures you get rid of loose rust thoroughly, setting a solid foundation for repainting and preventing further corrosion.
Sand With Fine Grit
After using a wire brush, it’s important to smooth out the surface further by sanding with fine grit sandpaper. Choose a grit size between 220 and 400 for best results, as it effectively removes remaining loose rust and old paint without damaging the metal. Use a consistent sanding technique, applying even pressure and following the grain of the surface. This step guarantees a smooth, clean base for repainting.
| Grit Size | Purpose | Technique Tip |
|---|---|---|
| 220-320 | Light rust and paint removal | Use gentle, overlapping strokes |
| 400 | Finishing smooth surface | Sand with light pressure |
| 600+ | Polishing and prep for paint | Use minimal pressure |
Use a Rust Remover or Vinegar Solution for Stubborn Spots

Choosing the right rust remover can make all the difference in restoring your grill. You need to understand how to apply vinegar effectively for stubborn spots without causing damage. Let’s explore how to select the best product and use vinegar properly to get your grill looking new again.
Choosing the Right Remover
When dealing with stubborn rust spots on your grill, selecting the right remover can make all the difference. You need a product that effectively targets rust without compromising metal safety or risking chemical safety. Consider these options:
- Commercial rust removers designed for outdoor metal surfaces
- White vinegar or apple cider vinegar for a natural approach
- Baking soda paste for gentle scrubbing
- Rust converters that transform rust into a protective coating
Make certain you read labels carefully, especially regarding chemical safety, to avoid harmful fumes or reactions. Metal safety is vital; choose removers formulated for your grill’s material to prevent damage. Always wear gloves and work in a well-ventilated area. Picking the right remover tailored for your needs guarantees effective rust removal while keeping your grill and yourself safe.
Applying Vinegar Effectively
Vinegar is a simple, effective solution for tackling stubborn rust spots on your grill. Its vinegar benefits include naturally dissolving rust without harsh chemicals, making it a safe choice for your equipment and environment. To apply vinegar effectively, soak a cloth or sponge in white vinegar and press it onto the rusted areas. Let it sit for at least 30 minutes to loosen the rust. For stubborn spots, you can also use a spray bottle for even coverage. Remember to follow safety precautions—wear gloves to protect your skin and work in a well-ventilated area. After treatment, use a scrub brush or steel wool to remove remaining rust, then rinse thoroughly with water. This method ensures a safer, more efficient rust removal process.
Sand the Surface to Smooth Out Rusted Areas

To effectively remove rust and prepare the surface for painting or sealing, start by sanding the affected areas. This step guarantees proper surface preparation and rust smoothing, which helps the new coating adhere better. Use medium-grit sandpaper and focus on rusted spots, removing loose flakes and rough patches. Imagine your grill as a canvas:
- Rough rust spots become smooth and even
- Sharp edges are rounded off
- Surface becomes clean and matte
- Rusted areas blend seamlessly with the surrounding metal
As you sand, apply consistent pressure to avoid gouging the surface. This process not only improves rust smoothing but also creates a clean base for the next steps in your restoration project, ensuring a longer-lasting finish.
Wipe Down and Dry the Grill Completely

After sanding the rusted areas and smoothing the surface, it’s important to wipe down the grill thoroughly to remove dust, debris, and residual particles. Use a clean, damp cloth or tack cloth to make certain no particles are left behind that could interfere with your paint or rust prevention efforts. Make sure to reach all surfaces, including crevices and vents. Once cleaned, dry the grill completely with a dry cloth or towel to prevent moisture from causing further rust. Properly wiping down and drying your grill enhances your overall grill maintenance routine and helps prevent future rust formation. A clean, dry surface provides a solid foundation for repainting and ensures your grill stays protected from rust in the long run.
Apply a High-Temperature Primer or Rust Inhibitor

Choosing the right high-temperature primer or rust inhibitor is key to lasting protection. You need to take into account the material of your grill and follow the manufacturer’s instructions carefully. Proper application techniques ensure the primer bonds well and provides effective rust prevention.
Selecting Appropriate Primer
Have you considered the importance of using the right primer when restoring your grill’s surface? Choosing a high-temperature primer or rust inhibitor ensures proper metal bonding and enhances primer adhesion. This step is essential for a durable finish that withstands heat and outdoor elements. Look for primers specifically designed for grills or metal surfaces, which resist peeling and corrosion. Visualize a surface sealed with:
- A heat-resistant coating that clings tightly to metal
- Rust inhibitors that prevent future corrosion
- A primer compatible with your chosen paint
- An easy-to-apply formula for even coverage
Selecting the appropriate primer guarantees your paint adheres well and lasts longer. It’s a crucial foundation that protects your investment and ensures your restored grill remains rust-free and visually appealing for years to come.
Proper Application Techniques
Applying your high-temperature primer or rust inhibitor correctly is key to guaranteeing your restoration lasts. Start by cleaning the surface thoroughly, removing any rust or debris, and following proper seasoning techniques to enhance adhesion. When applying, use even strokes and a spray or brush suited for high temperatures to avoid drips or uneven coverage. Be sure to wear grill safety tips like gloves and a mask to protect yourself from fumes. Maintain proper distance to prevent overspray and ensure a smooth, consistent coat. Allow the primer or inhibitor to dry completely before proceeding with painting or seasoning your grill. Proper application not only improves durability but also helps prevent future rust buildup, making your grill safer and ready for many more cookouts.
Repaint With Heat-Resistant Grill Paint

Repainting your grill with heat-resistant paint is an effective way to restore its appearance and protect it from future rust. This step enhances your grill’s durability and makes cleaning easier. Before starting, ensure proper grill maintenance by thoroughly cleaning and removing any rust or debris. Follow safety precautions, such as working in a well-ventilated area and wearing gloves. When applying the paint, imagine a smooth, even coat covering every surface, like a fresh armor shield. Visualize the vibrant color transforming the dull surface, giving your grill a new life. Use a high-temperature, heat-resistant paint suitable for grills, and follow the manufacturer’s instructions closely. This simple upgrade will keep your grill looking great and functioning well for many cookouts to come.
Reassemble and Conduct a Test Run

Once the paint has fully dried and cured, you can begin reassembling your grill. Carefully put all the parts back together, making sure they’re secure and properly aligned. Before igniting the grill, double-check that all safety components are in place, promoting grill safety during operation. Conduct a quick visual inspection to confirm no tools or debris are left inside. Set up your grill in an outdoor setup that provides good ventilation, reducing the risk of smoke buildup or fire hazards. Before cooking, perform a test run by turning on the burners at a low heat to check for proper operation and any leaks. This step ensures your grill functions safely and efficiently, giving you peace of mind for your next outdoor barbecue.
Frequently Asked Questions
How Often Should I Inspect My Grill for Rust?
You should inspect your grill for rust at least once a month as part of regular grill maintenance. Frequent checks help you catch rust early, making rust prevention easier. Look for any signs of rust or corrosion, especially after heavy use or bad weather. Promptly addressing rust helps extend your grill’s lifespan and keeps it safe to use. Regular inspections keep rust from becoming a bigger problem, ensuring your grill stays in top shape.
Can I Use Regular Paint on My Grill?
You shouldn’t use regular paint on your grill, as it lacks the durability needed for high heat and outdoor conditions. Instead, opt for a high-temperature, rust-resistant coating designed specifically for grills. These paints offer better paint durability and protection against rust, ensuring your grill stays protected and looks great longer. Always follow the manufacturer’s instructions for proper application, and verify your grill is thoroughly cleaned before painting.
What Safety Precautions Are Necessary During Rust Removal?
Think of rust removal like armor for your safety; you wouldn’t go into battle unprotected. Always wear protective gear—gloves, goggles, and a mask—to shield yourself from rust particles and fumes. Guarantee proper ventilation precautions, like working outdoors or in a well-ventilated area, to prevent inhaling harmful dust or fumes. These steps keep you safe while effectively removing rust, so your grill stays in top shape without risking your health.
How Long Does the Repainting Process Typically Take?
Repainting your grill usually takes about 24 to 48 hours, depending on the type of paint you use. You should allow ample time for the paint to dry completely before using the grill again, ensuring proper paint drying. During this period, the paint forms a protective layer that helps with rust prevention. Plan ahead, and avoid cooking on the grill until the paint has fully dried for the best results.
Is It Better to Replace a Heavily Rusted Grill Instead of Repairing?
If your grill is heavily rusted, replacing it might be a better choice than repairing, especially when considering cost analysis and safety considerations. Repairing can become costly and time-consuming, and rust can compromise structural integrity. A new grill guarantees safety, durability, and better performance, making it a smarter investment in the long run. Weigh the repair costs against replacement to make the most informed, safe decision for your grilling needs.
Conclusion
With a little effort, you can transform your rusty grill back to life. Did you know that a rusty grill can harbor bacteria, making your food unsafe? By following these simple steps, you’ll not only improve its appearance but also guarantee safer, tastier meals. Regular maintenance can extend your grill’s lifespan by up to 50%. So, roll up your sleeves and enjoy many more delicious barbecues to come!